practice
EXPENSE MANAGEMENT APP
frontend
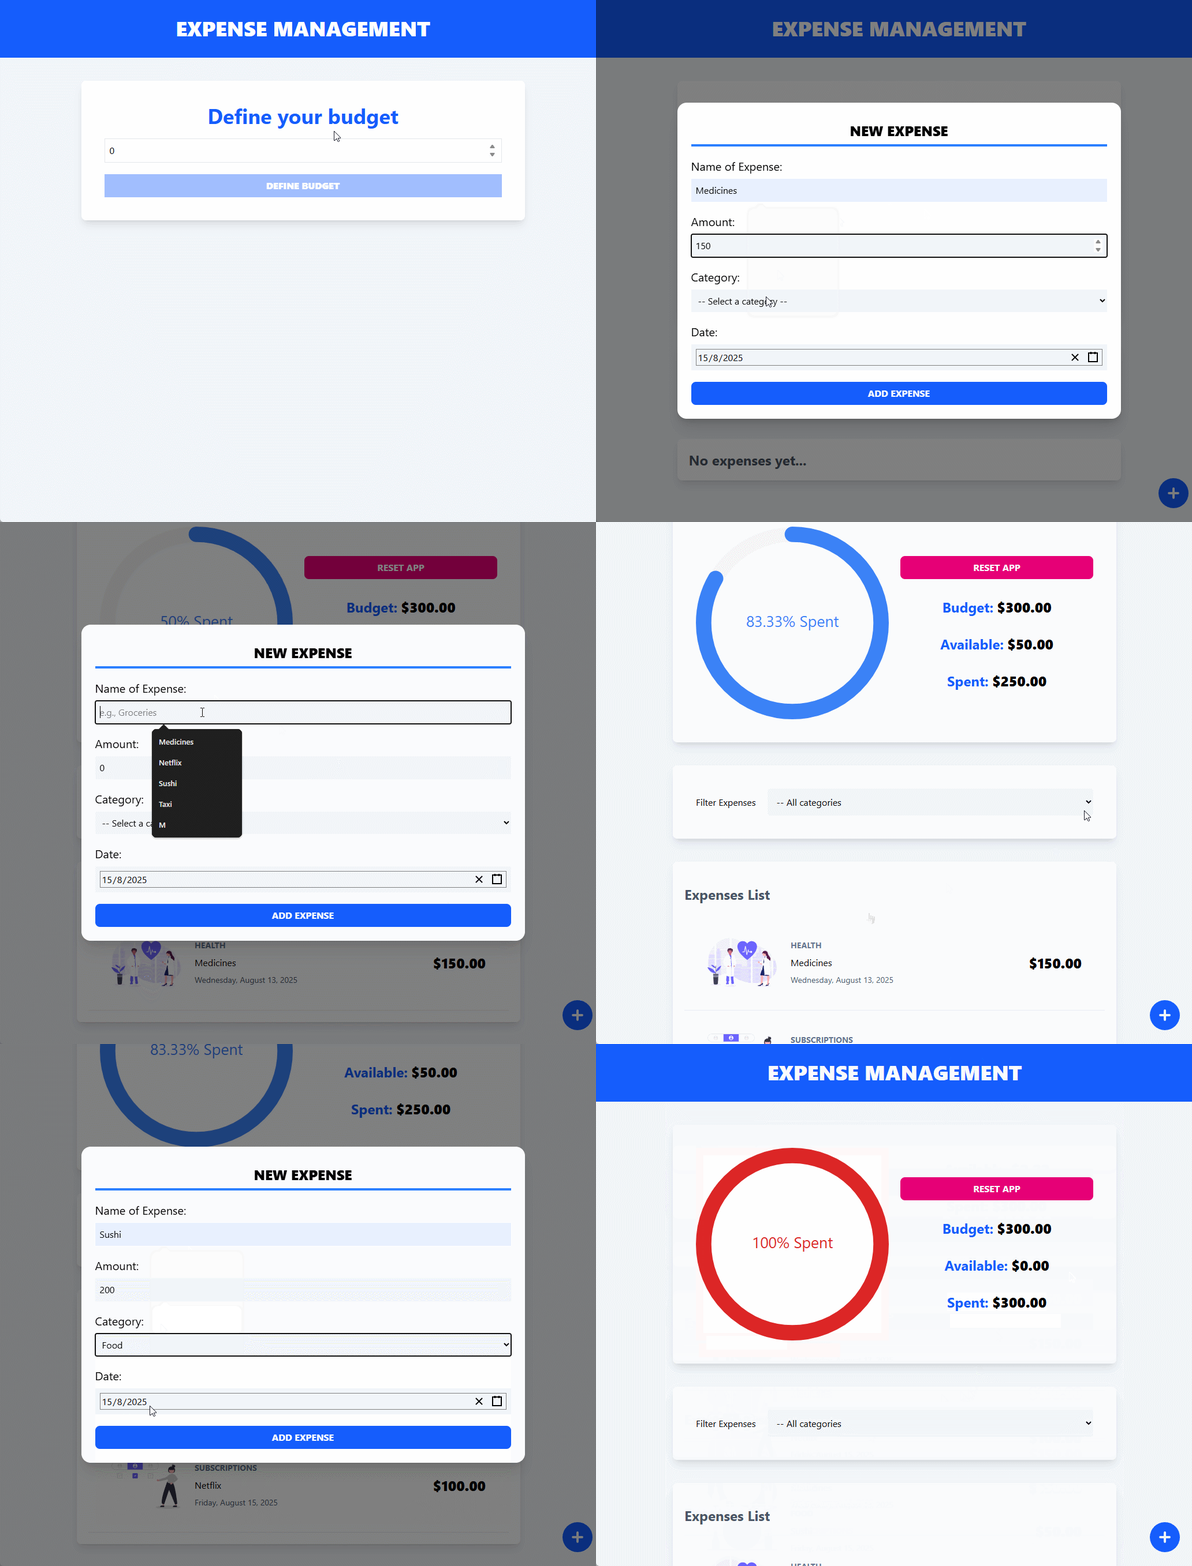
Expense management where we can define an initial budget using a form with validations. The main interface (using Headless UI) displays four main elements.
2026 - FULL-STACK DEVELOPER
⊹Expense management where we can define an initial budget using a form with validations. The main interface (using Headless UI) displays four main elements.
PORTFOLIO WEB
⊹origin
https://expense-management.4hmartin.com/
section
Home
category
practice
development type
frontend
PORTFOLIO WEB
⊹Expense management where we can define an initial budget using a form with validations. The main interface (using Headless UI) displays four main elements.
The first is the budget calculations (initial amount, available amount, and amount spent) with visual support (circular bar chart) and a button to restart the app, allowing you to re-enter a value for the initial budget.
A selector to filter expenses by available categories.
A list of the expenses entered, with information about each entry.
And a button at the bottom right to open a modal window showing the form for adding a new expense to the app.
A boilerplate is implemented using Context API and useReducer to manage the state globally, facilitating access to the different states through a custom hook.
Using Context API and useReducer results in a more efficient and scalable design.
1export type BudgetState = {
2    budget: number;
3    modal: boolean;
4    expenses: Expense[];
5    editingID: Expense['id'];
6    currentCategory: Category['id']
7}1export type BudgetActions =
2 { type: 'add-budget', payload: { budget: number } } |
3 { type: 'show-modal' } |
4 { type: 'close-modal' } |
5 { type: 'add-expense', payload: { expense: DraftExpense }} |
6 { type: 'remove-expense', payload: { id: Expense['id'] }} |
7 { type: 'get-expense-by-id', payload: { id: Expense['id'] }} |
8 { type: 'update-expense', payload: { expense: Expense }} |
9 { type: 'reset-app' } |
10 { type: 'add-filter-category', payload: { id: Category['id'] }}Numeric input to define the initial budget and enable the button.
Using the 'react-circular-progressbar' library, a graph is rendered showing the percentage of the budget spent.
1<CircularProgressbar
2    value={percentage}
3    styles={buildStyles({
4        pathColor: percentage === 100 ? '#DC2626' : '#3B82F6',
5        trailColor: '#F5F5F5',
6        textSize: '8',
7        textColor: percentage === 100 ? '#DC2626' : '#3B82F6'
8    })}
9    text={`${percentage}% Spent`}
10/>As its name suggests, it resets the initial budget to 0 using 'dispatch'.
1<button
2    type="button"
3    className="bg-pink-600 w-full p-2 text-white uppercase font-bold rounded-lg cursor-pointer hover:bg-pink-700 transition-colors"
4    onClick={() => dispatch({type: 'reset-app'})}
5>
6    Reset App
7</button>The reusable “AmountDisplay” component displays the values calculated based on the initial budget and accumulated expenses.
1<AmountDisplay
2    label="Budget"
3    amount={state.budget}
4/>Select: Import the categories from the “/data/categories” file to iterate and display select options. Change event + dispatch.
1const handleChange = (e: ChangeEvent<HTMLSelectElement>) => {
2    dispatch({ type: 'add-filter-category', payload: { id: e.target.value }})
3}heroicons to import the “+” icon, PlusCircleIcon. headlessui to import Dialog and Transition to handle the logic of the modal with the form.
Two main types of expenses are defined: “DraftExpense” without an ID and “Expense” with an ID (added from reducer once the data has been validated).
Simple validation to check that all fields have been filled in and that the budget limit has not been reached.
From the “state” imported via the custom hook “useBudget”, it is evaluated whether the ID of the expense to be edited “state.editingID” is defined in order to fill in the form fields with the expense to be edited or not.
1// Add new expense or edit vía dispatch
2if(state.editingID){
3    dispatch({ type: 'update-expense', payload: {expense: { id: state.editingID, ...expense }} })
4} else {
5    dispatch({ type: 'add-expense', payload: { expense } })
6}For the date picker field, the “react-date-picker” library is used:
1import DatePicker from 'react-date-picker';
2
3<DatePicker
4    name="expenseDate"
5    id="expenseDate"
6    className="bg-slate-100 p-2"
7    onChange={handleChangeDate}
8    value={expense.date}
9/>In this project, useReducer is used to handle all logic related to managing expenses added via the modal form.
The reducer is imported into the “BudgetContext.tsx” file to instantiate the reducer and thus allow access to the state and actions of the reducer in the global context.
1// src/reducers/budget-reducer.ts
2import { budgetReducer, initialState, type BudgetActions, type BudgetState } from "../reducers/budget-reducer"
3
4export const BudgetProvider = ({children}: BudgetProviderProps) => {
5
6    // 2. Instanciar el reducer
7    const [state, dispatch] = useReducer(budgetReducer, initialState)
8    ...
9
10export type BudgetActions =
11    { type: 'add-budget', payload: { budget: number } } |
12    { type: 'show-modal' } |
13    { type: 'close-modal' } |
14    { type: 'add-expense', payload: { expense: DraftExpense }} |
15    { type: 'remove-expense', payload: { id: Expense['id'] }} |
16    { type: 'get-expense-by-id', payload: { id: Expense['id'] }} |
17    { type: 'update-expense', payload: { expense: Expense }} |
18    { type: 'reset-app' } |
19    { type: 'add-filter-category', payload: { id: Category['id'] }}
20 


